Thursday, 30 October 2008

Wireless Repeater

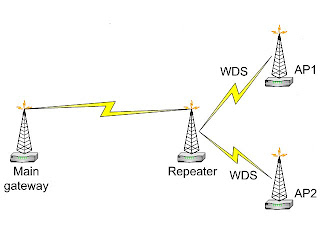
This example shows how to configure a wireless repeater. Wireless repeater extends the range of an existing WLAN instead of adding more access points. Consider the network layout:


We will use two wireless interfaces (two antennas) on the repeater router. WDS links will be established between 'Main gateway' and 'Repeater', 'Repeater' and 'AP1', 'AP2' (end-users are connected to the AP1 and AP2).

Note, client wireless interfaces (station, ad-hoc, infrastructure) do not support bridging because of the limitations of 802.11.


Quick Start

Main Gateway configuration export:

/ ip address add address=192.168.0.1/24 interface=wlan1
/ interface wireless set wlan1 disabled=no mode=ap-bridge band=5ghz frequency=5180 ssid=Main_gw wds-mode=static
/ interface wireless wds add disabled=no wds-address=XX:XX:XX:XX:XX:X2 master-interface=wlan1
/ interface bridge add
/ interface bridge port add interface=wlan1 bridge=bridge1
/ interface bridge port add interface=wds1 bridge=bridge1

Repeater configuration export:

/ interface wireless set wlan1 disabled=no mode=ap-bridge band=5ghz frequency=5180 ssid=Main_gw wds-mode=static
/ interface wireless wds add disabled=no wds-address=XX:XX:XX:XX:XX:X1 master-interface=wlan1
/ interface bridge add
/ interface bridge port add interface=wlan1 bridge=bridge1
/ interface bridge port add interface=wds1 bridge=bridge1

/ interface wireless set wlan2 disabled=no mode=ap-bridge band=5ghz frequency=5805 ssid=To_clients wds-mode=static
/ interface wireless wds add disabled=no wds-address=XX:XX:XX:XX:XX:X4 master-interface=wlan2
/ interface bridge port add interface=wlan2 bridge=bridge1
/ interface bridge port add interface=wds2 bridge=bridge1
/ ip address add address=192.168.0.2/24 interface=bridge1

AP1, AP2 configuration export:

/ interface wireless set wlan1 disabled=no mode=ap-bridge band=5ghz frequency=5805 ssid=To_clients wds-mode=static
/ interface wireless wds add disabled=no wds-address=XX:XX:XX:XX:XX:X3 master-interface=wlan1
/ interface bridge add
/ interface bridge port add interface=wlan1 bridge=bridge1
/ interface bridge port add interface=wds1 bridge=bridge1
/ ip adress add address=192.168.0.3/24 interface=wlan1

Explanation
Main Gateway

/ ip address add address=192.168.0.1/24 interface=wlan1

The wireless interface has the name 'wlan1' and IP address of 192.168.0.1/24. It will be the default gateway for other nodes in the network.

/ interface wireless set wlan1 disabled=no mode=ap-bridge band=5ghz frequency=5180 ssid=Main_gw wds-mode=static

Rule enables wireless interface and sets up appropriate configuration: band, frequency (WDS peers all need to be on the same frequency), SSID, wds-mode (static - WDS interfaces created manually in static mode).

/ interface wireless wds add disabled=no wds-address=XX:XX:XX:XX:XX:X2 master-interface=wlan1

The rule creates WDS interface on the particular 'master-interface', where 'wds-address' is the remote WDS peer MAC-address.

/ interface bridge add
/ interface bridge port add interface=wlan1 bridge=bridge1
/ interface bridge port add interface=wds1 bridge=bridge1

First we create bridge interface on the router, then 'wlan1' and 'wds1' interface are added to the bridge.

Repeater

Let us consider wireless repeater configuration. First we need to establish communication to 'Main Gateway' router.

/ interface wireless set wlan1 disabled=no mode=ap-bridge band=5ghz frequency=5180 ssid=Main_gw wds-mode=static
/ interface wireless wds add disabled=no wds-address=XX:XX:XX:XX:XX:X1 master-interface=wlan1
/ interface bridge add
/ interface bridge port add interface=wlan1 bridge=bridge1
/ interface bridge port add interface=wds1 bridge=bridge1

The rules are quite similar to 'Main Gateway' configuration rules. We need to enable wireless interface, than set appropriate wireless and WDS configuration (don't forget about the same frequency channel) and add interface to created bridge.

/ interface wireless set wlan2 disabled=no mode=ap-bridge band=5ghz frequency=5805 ssid=To_clients wds-mode=static
/ interface wireless wds add disabled=no wds-address=XX:XX:XX:XX:XX:X4 master-interface=wlan2
/ interface bridge port add interface=wlan2 bridge=bridge1
/ interface bridge port add interface=wds2 bridge=bridge1
/ ip address add address=192.168.0.2/24 interface=bridge1

Next, we should configure second wireless interface. Rules are very similar to the previous one. IP address configuration is required for troubleshoot options. Repetear will work fine without IP address configuration.

AP1, AP2 configuration

/ interface wireless set wlan1 disabled=no mode=ap-bridge band=5ghz frequency=5805 ssid=To_clients wds-mode=static
/ interface wireless wds add disabled=no wds-address=XX:XX:XX:XX:XX:X3 master-interface=wlan1
/ interface bridge add
/ interface bridge port add interface=wlan1 bridge=bridge1
/ interface bridge port add interface=wds1 bridge=bridge1
/ ip adress add address=192.168.0.3/24 interface=wlan1

Finally, we need to configure AP1, AP2 client routers, which will provide connection to the Internet for the end-user. Add client interface to bridge (Ethernet, wireless). AP1 and AP2 clients will use 192.168.0.0/24 subnet, AP1 and AP2 clients will communicate as they are connected to the one switch.

Sambungannya... (klik disini!)

Wireless Area

Area is a part of a mesh network, for limiting station access to a certain number of APs (e.g., a building or a block). All APs within the mesh may have the same SSID, but stations will select only a few ones, based on their area code.

The Area setting is configured on APs in the wireless menu. This can be done with the goal to limit connectivity (to force the station to stay within a certain area) , or to improve connection quality (as the station will not try to connect to APs from other areas, which may have worse signal quality).


[admin@router] /interface wireless> set wlan1 area=

The stations can be configured to connect to any AP that has its area code beginning with a certain string (area-prefix parameter in wireless connect list), so you configure areas within areas, and make some stations only work within a subarea, and allow some other stations to work within a larger area.

[admin@router] /interface wireless connect list> add area-prefix=

For example stations with area-prefix="area1" will connect to any AP with area code "area1.1" and "area1.2", but if you specify area prefix as "area1.1", then that station will only connect to APs with area code "area1.1"; you can subdivide areas even further.

Sambungannya... (klik disini!)

Wednesday, 29 October 2008

How to make a HotSpot gateway

The MikroTik HotSpot Gateway enables providing of public network access for clients using wireless or wired network connections. HotSpot Gateway should have at least two network interfaces:

1. HotSpot interface, which is used to connect HotSpot clients

2. LAN/WAN interface, which is used to access network resources.

The following picture shows wireless HotSpot setup


To setup simple HotSpot Gateway follow the steps below:


1. Configure wireless interface on HotSpot Gateway:

[admin@HotSpot_Gateway]> interface wireless set wlan1 ssid=HotSpot band=2.4ghz-b \
\... mode=ap-bridge

2. Configure ip address for HotSpot interface:

[admin@HotSpot_Gateway] > ip add add address=192.168.0.1/24 interface=wlan1

3. Configure ip address for WAN/LAN interface:

[admin@HotSpot_Gateway] > ip add add address=10.5.8.250/24 interface=ether1

4. Add a route on HotSpot Gateway

[admin@HotSpot_Gateway] > ip route add gateway=10.5.8.1

5. Configure Hotspot on wlan1 interface and add user admin with pasword test

[admin@MikroTik] > ip hotspot setup
hotspot interface: wlan1
local address of network: 192.168.0.1/24
masquerade network: yes
address pool of network: 192.168.0.2-192.168.0.254
select certificate: none
ip address of smtp server: 0.0.0.0
dns servers: 10.5.8.2
dns name: hs.example.net
name of local hotspot user: admin
password for the user: test

In order to access network resources HotSpot clients have to configure their wireless interfaces setting proper ssid, band and mode, and enabling dynamic host configuration (dhcp) on the wireless interface.

Sambungannya... (klik disini!)

Beginner's Guide Untuk Netadmin

Perkembangan Internet yang pesat telah membuat security di Internet menjadi masalah yang besar. Selama tahun 2000 kemarin, banyak sekali site yang berhasil dibobol oleh para hacker dan bahkan site Microsoft sendiri tidak luput dari incaran mereka. Seperti yang kita ketahui, banyak perusahaan telah meng-install Internet server and meng-host server mereka di lingkungan network mereka sendiri dan menghubungkannya ke Internet melalui media leased line. Yang secara tidak langsung dan sadar atau tidaknya mereka telah terhubung dengan Worldwide network. Meskipun network perusahaan ter-install berbagai proteksi tool seperti proxy, firewall atau tool intrusion detection lainnya, akan tetapi, pencuri selalu selangkah di depan polisi.
Firewalls adalah salah satu tool yang berkembang dengan cepatnya dalam arti diterima oleh pemakai IT terutama di lingkungan. Seberapa powerful firewall tersebut, tetapi jika system administratornya lalai dalam pekerjaannya, tidak akan banyak gunanya, karena kebanyakan lubang security di sebuah sistem itu disebabkan oleh kelalaian seorang administrator dalam meng-update patchnya.


Artikel ini sifatnya hanya sebagai saran atau ide bagi seorang pemula sebagai system administrator dan di buat supaya gampang dimengerti, juga tersedia dalam bahasa Inggris yang isinya hampir sama. Langkah yang tercakup di artikel ini dapat diterapkan dalam berbagai situasi. Saya mengambil contoh penerapan dalam lingkungan Windows NT OS. Semua langkahnya sederhana dan saya percaya, kita semua akan dapat dengan mudah mengikutinya. Adapun yang dicakup dalam tulisan ini antara lain:
  • OS Installation
  • Tools tambahan
  • Selalu up-to-date (Staying current)

OS Installation
Langkah terbaik untuk membuat NT system kita secure adalah di awal awal yaitu pada tahap instalasi OS. Kita tidak boleh mengandalkan semua instalasi terdahulu yang bukan dilakukan oleh kita sendiri. Mengapa??? Karena dengan begitu kita tidak akan tahu apa yang sebenarnya running di sistem kita. Dengan kita meng-instalasi sendiri dan meng-setup sendiri, kita akan tahu persis apa yang kita lakukan dan apa yang running.
Berikut adalah beberapa tips dalam instalasi OS:
  • Usahakan untuk tidak meng-install OS ke default direktori sebagai contohnya untuk NT yaitu C:\Winnt atau D:\winnt. Kecuali memang terpaksa dilakukan.
  • Untuk file systemnya, pilih NTFS dengan tingkat security yang lebih bagus dibandingkan dengan FAT
  • Sesudah selesai instalasi, create satu user dan memberikan haknya sama dengan admin. Rename default administrator. Dengan meng-rename administrator, dimana seluruh dunia sudah tahu bahwa administrator secara deafultnya adalah powerful account, kita sudah menambah satu lapisan security.
  • Ide lainnya yaitu bikin satu dummy Administrator account yang tidak punya hak apa apa seperti layaknya guest account biasa saja. Dan track apakah ada yang mencoba melakukan logon dengan account ini.
  • Untuk password administrator yang sebenarnya, pergunakan kombinasi antara abjad dan angka dengan panjang sekurang-kurangnya 8 karakter.
  • Account Policy mengontrol bagaimana password dan logon account digunakan. Beberapa saran antara lain:
  • Set "Minimum Password Length" menjadi 8 characters
  • Set "Account lockout" untuk lockout setelah 3 bad logon.
  • User rights mengontrol siapa bisa mengakses apa. Jika tidak diperlukan, grup Everyone bisa dibuang tergantung dari kebutuhan.
  • Edit registry untuk membatasi akses ke sistem kita. Untuk membatasi koneksi anonymous , set RestrictAnonymous to 1 HKEY_LOCAL_MACHINE\SYSTEM\CurrentControlSet\Control\Lsa
  • Untuk membatasi access to the registry, tambahkan registry key berikut ini: HKEY_LOCAL_MACHINE\SYSTEM\CurrentcontrolSet\Control\SecurePipeServers\winreg
Sesudah instalasi, sebelum dikonek ke network, install semua patch atau hotfix yang ada.
Seluruh ide selama proses instalasi adalah untuk meng-install dan mengkonfigurasi services seminim mungkin dalam pengertian yang diperlukan saja. Semakin sedikit services yang running, semakin sedikit pula security issue/exploit di sistem kita.

Tool Tambahan
Dan jika network kita akan dikoneksi dengan dunia luar ( Internet). Kita perlu menambahkan tool seperti proxy server dan firewall di network kita. Walaupun tidak akan menjamin 100% aman dari penyusup, tetapi setidaknya bisa membantu memproteksi network kita dan membuat para penyusup bekerja ekstra lebih keras jika ingin mencoba mengutak atik sistem kita.
Adapun software lain yang mungkin perlu kita install untuk mendeteksi adanya trojan di sistem kita adalah anti virus software. Untuk jauh lebih tahu mengenai trojan, dapat dilihat di bagian hacking di jasakom site.

Selalu Up-to-date (Staying Current)
Masalah di security adalah, begitu sistem kita sudah aman, exploit lain yang baru akan muncul. Jadi untuk membuat 'stay current', saya mempunyai beberapa saran:
  • Pertama, ikuti beberapa mailing list, sehingga kita akan di-update melalui email mengenai security issue terbaru. Kadang saya sendiri lupa untuk mengecek sendiri security issue terbaru. Jika anda menggunakan microsoft sebagai platform anda, saya menyarankan untuk mendaftar microsoft security buletin.
  • Terus meng-update sistem kita dengan patch terbaru atau hotfix. Adakalanya patch itu sendiri yang menambah exploit baru, meskipun sangat jarang.
  • Gunakan command "netstat -na", untuk mengecek koneksi yang terbuka. Usahakan dilakukan secara rutin, untuk melihat port kita yang terbuka dan apakah ada address asing yang mencoba mengakses.
  • Kunjungi web site www.jasakom.com sesering mungkin untuk melihat exploit yang terbaru dan tips tips terbaru untuk mengamankan web site kita.

Akhir kata, artikel ini dibuat berdasarkan apa yang saya tahu dan berdasar informasi yang saya dapatkan di net dan pengalaman. Semua yang tercantum di sini sifatnya adalah saran, semua hal yang dilakukan adalah at your own risk:-). Artikel masih dalam tahap draft. Jika anda punya saran atau pertanyaan ataupun kritik, silahkan kirim email. Saya bisa saja salah dalam beberapa bagian di artikel ini. Seperti kata pepatah, di atas langit masih ada langit. Cheers :-)

Penulis
Iceberg enjoys learning Internet Security. Before this, he is the network administrator for years where he experiences up things of a different nature. You can reach him at

Sambungannya... (klik disini!)

Menjadi Seorang Technical Support

Selain sebagai administrator terkadang aku juga “diperbantukan” untuk menjadi technicall support, ternyata untuk menjadi technicall support ini ngga lah se gampang yang orang kira, selain butuh pengetahuan perangkat komputer, kita juga butuh mental baja, untuk menghadapi orang orang yang terkadang menyulitkan, selain itu kita tidak bisa kerja 1 per satu, selalu saja ada intrupsi nya, jadi butuh kesabaran yang tinggi untuk menjadi seorang IT Helpdesk atau IT Technical Support. disini aku akan menyimpulkan bagaimana menjadi seorang technical support yang handal, dan terkadang aku juga ngga tahan emosinya, tapi ada beberapa tips yang patut diketahui dan ada juga beberapa situasi yang paling ngga kita sukai dalam bidang profesi seperti ini, mungkin hal ini bisa terjadi karena peraturan mengenai IT Technicall support itu sendiri yang belum jelas… oke, dimulai dari contoh seorang technical support yang baik diantaranya adalah:


Contoh baik-nya

  • Update, dan implementasikan, maksudnya adalah kemampuan menggunakan pengetahuan pada situasi baru, IT itu selalu berkembang, dan kita juga ngga bisa tinggal diam, seorang IT technical support harus selalu mengembangkan dirinya terhadap hal hal yang baru, metode metode yang baru, sistem yang baru, walaupun di dalam infrastruktur IT kita kita belum memiliki sistem tersebut, jawabanya adalah “Virtualisasi”. Dengan kemampuan ini disertai dengan kemampuan berfikir yang logis dan praktis akan membentuk kemampuan seorang troubleshooter yang handal sehingga kemampuan dengan mengadaptasi suatu pengetahuan pada situasi yang baru akan sangat penting dan baik untuk seorang support
  • Disiplin Pribadi, segala sesuatu yang harus dikerjakan oleh seorang IT technical support seharusnya terjadwal dan tertata dengan baik. Menjadi support yang berdisiplin mempengaruhi beberapa aspek, misalnya dengan membuat daftar jadwal, deadline, meeting, dengan membuat prioritas deadline ini maka support menunjukan rasa hormat terhadap waktu user
  • Menghormati semua user, Angota tim, dan atasan, meski tidak dibalas, hal ini merupakan bagian yang cukup sulit, terkadang kalau kita selesai membantu orang kita pasti berharap, ya , setidaknya tersenyum dan say “thanks!”, bagaimana kalau dia tetep jutek ?, ingat bukan itu inti dari semua ini karna, yang paling penting adalah persepsi user terhadap masalah dan itulah yang harus di jawab oleh seorang support. Menunjukan rasa hormat merupakan sebuah pernghargaan atas nilai pengetahuan seseorang.kenapa hal ini penting untuk seorang support karena jika user tidak percaya bahwa kita tidak dapat menangani masalah dengan baik maka kita akan mengalami kesulitan komunikasi.
  • Kemampuan dan mau berkomunikasi, hal ini juga sangat baik untuk kita pada saat kita mengidentifikasikan masalah yang ada oleh user, kita harus memiliki social engineering yang baik dengan jadi pendengar yang baik dan ramah, user akan lebih senang menceritakan masalahnya, karena seorang support adalah jembatan antara user dan support dan support juga di kenal di semua kalangan organisasi, maka dari itu support harus dapat menerjemahkan antara bahasa teknis dan bahasa sehari hari sehingga user dengan mudah mencerna penjelasan seorang support, support harus belajar mendengarkan user, melihat realitas masalah, menerjemahkan deskripsi mereka kedalam bahasa teknis dan memperbaiki segaligus menjelaskan solusi masalah yang dialami agar bisa di mengerti user
  • Kemampuan berfikir logis dan kreatif, hal ini sangat penting untuk diperhatikan bagi seorang technical support karna setiap penjelasan memiliki jawaban teknis yang logis yang harus dijelaskan ke user dengan semudah mungkin untuk dipahami ketika user bertanya support harus memiliki teknologi yang konsisten dan pola berfikir yang logis dalam menyelesaikan masalah, sehingga dengan begini walaupun support menemui masalah baru namun kemungkinan besar ia dapat memecahkan masalahnya, atau setidaknya ia mengetahui mekanisme masalah yang dialamainya.
  • Sikap rendah hati, ini juga penting, karna jika kita merasa aji mumpung kita yang paling jago soal IT kita bisa semena mena, kalau kita berfikir orang lain tidak bisa bekerja tampa kita, hal itu sudah salah besar, karna itu akan mencerminkan bahwa IT technical support adalah pusat degradasinya performance kerja, karna yang harus kita lakukan hanyalah agar kita tidak sombong terhadap user, dan menghargai penjelasan user dalam prosesnya support harus siap untuk membaca manual, menerima koreksi dari yang lain menanyakan solusi kepada kolega atau bahkan menekan f1 untuk help, untuk mewujudkan hal itu semua dibutuhkan sikap yang rendah hati.
  • Belajar dari pengalaman dan pelatihan, yup, jangan takut sama hal ini, intinya sih belajar, support harus selalu mengupdate pengetahuanya di bidang nya, karena karakteristik teknologi tidak pernah berhenti terhadap waktu dan akan terus berkembang, dan jika seorang support ingin tetap produktif maka ia harus selalu mengupdate pengetahuanya
  • Cara kerja yang terperinci, yaitu dengan memperhatikan hal hal kecil yang ada di komputer, dan kita diharuskan mengetahui seluruh sistem dan cara kerja komputer, jadi pada saat kita melakukan troubleshoot kita melakukanya dengan step yang baik. dan akan mendapatkan hasil yang cepat dan analisis yang tepat dengan memberi perhatian pada hal kecil yang ada di komputer adalah hal yang penting bagi seorang support sehingga dengan membebaskan masalah user sementara kita dapat memecahkan persoalan yang masih harus dihadapi
  • Dedikasi dan komitmen menyelesaikan masalah, jangan pernah menyerah, karna kita harus mencari permasalahan sampai ke akar2 nya dan menyelesaikanya. Seorang support harus memiliki komitmen untuk melihat masalah sampai ke penyelesaianya dimana seperti yang kita ketahui kepuasan user terletak dari keberhasilan kita menjawab permasalahnya untuk kembali bekerja
  • Dapat menentukan prioritas, dengan mempelajari sistem kerja yang ada di perusahaan kita dapat menentukan prioritas siapa yang lebih di dahulukan ? kalau aku sih yang lebih di dahulukan adalah “Staff” daripada “Boss” karna bos tinggal nyuruh staff untuk kerja. Support harus mengetahui peran masing masing karyawan dalam organisasi sehingga jabatan / fungsi kerja dari karyawan yang meminta bantuan akan menjadi faktor utama dalam memberi prioritas tugas
  • Berbagi pengetahuan dengan anggota tim, atasan, dan, user, dengan cara mengajari user dengan bahasa yang lebih mudah aspek pengetahuan khusus dari kemampuan komunikasi support adalah mau berbagi pengetahuan, selain itu support juga harus mau mengedukasi user,melatih user, supaya menggunakan aplikasi dan periferal secara efektif dan mengajari mereka bagaimana cara melaporkan masalah komputer secara akurat.
  • Minat akan teknologi, slalu ter update mengenai bidangnya ya dengan langganan majalah komputer ( minta bayarin kantor ), support juga harus memiliki minat yang tinggi atas perjalanan teknologi hal ini akan berpengaruh saat organisasi berada dalam tahap pembaruan, sehingga support akan mempengaruhi sikap user dalam pembaharuan dan penggunaan teknologi terbaru ini
Contoh sikap buruk seorang IT Technical support
  • Melakukan Komunikasi yang tidak sepantasnya, (misalnya he he, mau bantu masalah user tapi muka cemberut ? ) kalau misalnya kita disuruh memasang cartridge printer, tentu kita akan memasang cartridge itu, namun jika kita memasang cartridge itu dengan muka yang cemberut, dan resah, dan berfikir apakah kita menghabiskan kuliah 4 tahun untuk memasang cartridge ? itu semua salah… kenapa tidak jadikan saja kesempatan untuk mengedukasi user ?
  • Pamer, dengan menggunakan bahasa yang tidak benar akan terkesan pamer di mata user, seperti bersihkan cache windows dan hapus objek network, ini mungkin banyak user yang tidak memahami arti ini, sehingga dimaata kita itu adalah benar, dan user akan terlihat bodoh dan menilai kita pamer seolah olah kita adalah superior dalam hal itu. Lebih baik berikan instruksi klik by klik
  • Hilang kesabaran, (aku masih payah di areal sini nih), terkadang ada beberapa user yang buta terhadap komputer dan pengoprasianya, dan membuat kita kehabisan kesabaran. karna beberapa masalah kecil dari user yang tidak dapat menggunakan komputernya.
  • Kasar, walaupun itu adalah masalah spele, sebaiknya berikan kenyamanan untuk user dengan baik, sehingga memungkinkan user akan membuka komunikasinya dengan lebih terbuka kepada kita, mengenai komputer dan masalah yang dialaminya
  • Tidak memberi informasi, segala hal hal yang baru dan berubah dalam lingkungan komputer sebaiknya di beritakan informasinya, walaupun user tidak mengerti
  • Kurang dokumentasi,tidak memberikan instruksi yang konsisten adalah langkah buruk bagi seorang it support, sebaiknya kita membuatkan sebuah prosedur dalam hal tertentu langkah demi langkah, sehingga user dan kita tidak repot dengan proses dan komunikasinya
  • Berbohong, nih parah nih mah
  • Kebanyakan Memberi informasi, Nah ini jg ngga perlu, ga harus ngalor ngidul juga kan ?
  • Tidak memberi pelatihan, nah ini jeleknya, kalau mau bantu, ingat, sambil beri pelatihan, bisa dengan cara user di instruksikan, atau user melihat apa yang kita kerjakan, itu lebih baik
  • Gagal mendengar, ini dah kaco kalau gini
Keluhan user
hal hal yang paling sering di keluhkan user adalah beberapa hal berikut ini :
  • Aplikasi hardware ga jalan, yup terkadang ini cukup menyebalkan kalau kita gagal memasang hardware baru untuk user.
  • Jaringan lambat ( lumayan sering ), ini tips yang sering aku lakukan di kantorku:
  • Cek Antivirus Update
  • Msconfig dan matikan program yang tidak perlu
  • Scan Running Program dan matikan
  • Restart ke save mode
  • Scan Spyware
  • Sering harus merubah password
  • Layar monitor terkunci
  • Bukan sebagai administrator komputer sendiri, kadang kalau user tau, dia jadi ngga bisa install aplikasi keinginan dia, dan itu menghambat dia
  • Spam filtering, terkadang ada user yang ngga mau di filter filter, dan dia gemar sekali buka situs porno
  • Akses web dibatasi, hmmm, gimana dengan ini ?
  • Tidak boleh menggunakan pc untuk urusan pribadi
  • IT tidak responsif, bisa jadi karna terlalu banyak antrian, atau kita yang malas
  • IT arogan ( hehe )
Beberapa contoh keadaan yang tidak mengenak kan oleh seorang IT technicall support

  • Disuruh memperbaiki dokumen word yang berantakan
  • Disuruh membuat dokumen yang ngga lazim
  • Hey ? kemana toolbar ku ?
  • Memarahi IT TS, karna spyware kyg minta dikukakan akses portnya.
  • Tidak mau menceritakan kenapa komputernya begini hanya mengatakan “ah ngga tau tiba tiba begini”
  • Menelfon dan membentak bentak ketika komputernya kena virus
  • Menelfon dengan nada keras ketika icon program di desktop nya ilang
  • dll….
Sebagian Material diambil dari majalah PC Media,
kalau ada yang mau bagi pengalaman ? ceritakan aja…..

Sambungannya... (klik disini!)

Tranparent Proxy Menggunakan Ubuntu 5.10 dengan koneksi ADSL

Saya menulis panduan ini diilhami oleh banyaknya pertanyaan di milist dan forum oleh rekan-rekan pengguna Linux (newbie khususnya) yang pada bingung mau share koneksi internet. Disini akan saya coba jelaskan tahapan setting proxy server menggunakan Squid beserta penggunaan delay pool untuk pembatasan bandwith. Panduan ini sudah diuji coba dan proxy server tersebut masih digunakan sampai dengan sekarang untuk melayani sekitar 60 klien pada saat yang bersamaan. Semoga panduan ini bermanfaat bagi yang membaca dan saya sendiri barangkali ada lupa suatu saat nanti. Segala koreksi, kritik dan saran, diskusi bisa dikirim ke email diatas.


Ada 3 macam proxy :
1. Manual Proxy
Dimana setiap klien harus mengisikan proxy server ip pada browser yang digunakan agar dapat menggunakan koneksi internet.
2. Transparent Proxy
Disisi klien bisa mengisi/tidak proxy server ip pada browser, dengan catatan ip gatewat klien dan dns server diset ke ip proxy server
3. NAT Proxy Server
Menggunakan MASQUERADE. Saya gak begitu faham, silahkan cari infonya di internet

Persiapan :
1. PC
Pada tutorial ini saya menggunakan spesifiaksi
• P4 1.8GHz
• RAM 1Gb
• HD 40 Gb
• 2 NIC

2. Ubuntu Linux 5.10 (bisa juga distro yang lain, sesuai selera deh)
3. ADSL Telepon Line
4. Modem ADSL (lupa merk tapi memiliki 4 port RJ45)
5. Software (Squid dan Bind9)


Topologi

(line-telepon)---(modem-adsl)---|eth0|(proxy-server)|eth1|---(switch)---(klien)

Modem
IP : 10.27.10.1
Subnet : 255.255.255.0
DNS server 1 : 202.134.0.155
DNS server 2 : 202.137.1.10

Proxy Server
iface eth0 inet static // eth0
address 10.27.10.3
netmask 255.255.255.0
network 10.27.10.0
broadcast 10.27.10.255
gateway 10.27.10.1

iface eth1 inet static // eth1, ip klien (LAN)
address 10.25.10.3
netmask 255.255.255.0
network 10.25.10.0
broadcast 10.25.10.255

DNS server (terletak di /etc/resolv.conf)
nameserver 202.134.1.10
nameserver 202.134.0.155

Untuk klien set ip address menggunakan kelas A/C terserah konfigurasi masing-masing. Tapi ingat ip klien harus sama kelasnya dengan kelas ip eth1 pada proxy server (khusus untuk topologi ini).


Tahapan
1. Instalasi Ubuntu Linux 5.10
Tidak akan dijelaskan karena terlalu panjang, silahkan referensi ke http://howtoforge.net/perfect_setup_ubuntu_5.10 ato situs yang lain. Saya menggunakan standard install dan auto partition pada saat instalasi.

2. Setting ip address
root@proxy:~# vi /etc/network/interfaces
# This file describes the network interfaces available on your system
# and how to activate them. For more information, see interfaces(5).

# The loopback network interface
auto lo
iface lo inet loopback

# This is a list of hotpluggable network interfaces.
# They will be activated automatically by the hotplug subsystem.
mapping hotplug
script grep
map eth0
map eth1

# The primary network interface
iface eth0 inet static
address 10.27.10.3
netmask 255.255.255.0
network 10.27.10.0
broadcast 10.27.10.255
gateway 10.27.10.1
# dns-* options are implemented by the resolvconf package, if installed
#dns-nameservers 202.134.0.115

iface eth1 inet static
address 10.25.10.3
netmask 255.255.255.0
network 10.25.10.0
broadcast 10.25.10.255

Restart network interfaces
root@proxy:~# /etc/init.d/networking restart

Cek routing tabel apakah sudah benar
root@proxy:~# route -n
Kernel IP routing table
Destination Gateway Genmask Flags Metric Ref Use Iface
10.25.10.0 0.0.0.0 255.255.255.0 U 0 0 0 eth1
10.27.10.0 0.0.0.0 255.255.255.0 U 0 0 0 eth0
0.0.0.0 10.27.10.1 0.0.0.0 UG 0 0 0 eth0

Patikan pada kolom gateway terdapat ip 10.27.10.1 dan pada interfaces eth0. Jika ip tersebut belum muncul maka tambahkan secara manual menggunakan :
root@proxy:~# route add default gw 10.27.10.1

Cek kembali routing table menggunakan perintah route –n.

3. Setting ip address DNS Server
root@proxy:~# vi /etc/resolv.conf
nameserver 202.134.1.10
nameserver 202.134.0.155

4. Testing koneksi
Setelah kongfigurasi ip lakukan testing terlebih dahulu untuk memastikan koneksi pada pc proxy server dapat berjalan dengan baik. Cobalah melakukan ping ke beberapa situs dan mendapatkan reply, tapi klo tidak ulangi step-step sebelumnya.
root@proxy:~# ping its.ac.id
PING its.ac.id (202.46.129.13) 56(84) bytes of data.
From 203.130.255.209 icmp_seq=1 Packet filtered
From 203.130.255.209 icmp_seq=2 Packet filtered
From 203.130.255.209 icmp_seq=3 Packet filtered
From 203.130.255.209 icmp_seq=4 Packet filtered

--- its.ac.id ping statistics ---
4 packets transmitted, 0 received, +4 errors, 100% packet loss, time 3002ms

root@proxy:~# ping iii.ac.id
PING iii.ac.id (72.232.21.250) 56(84) bytes of data.
From 203.130.255.209 icmp_seq=1 Packet filtered
From 203.130.255.209 icmp_seq=2 Packet filtered
From 203.130.255.209 icmp_seq=3 Packet filtered
From 203.130.255.209 icmp_seq=4 Packet filtered

--- iii.ac.id ping statistics ---
4 packets transmitted, 0 received, +4 errors, 100% packet loss, time 3001ms

root@proxy:~# ping google.com
PING google.com (64.233.187.99) 56(84) bytes of data.
From 203.130.255.209 icmp_seq=1 Packet filtered
From 203.130.255.209 icmp_seq=2 Packet filtered
From 203.130.255.209 icmp_seq=3 Packet filtered
From 203.130.255.209 icmp_seq=4 Packet filtered

--- google.com ping statistics ---
4 packets transmitted, 0 received, +4 errors, 100% packet loss, time 3003ms

5. Konfigurasi source list aptitude
Saya menambahkan beberapa mirror disini namun gak banyak saya gunakan, saya kira dari cdrom sudah ada peket squid.
root@proxy:~# vi /etc/apt/sources.list
deb cdrom:[Ubuntu 5.10 _Breezy Badger_ - Release i386 (20051012)]/ breezy main
restricted

deb http://kambing.vlsm.org/ubuntu breezy universe
deb-src http://kambing.vlsm.org/ubuntu breezy universe

deb http://kambing.vlsm.org/ubuntu breezy-security main restricted
deb-src http://kambing.vlsm.org/ubuntu breezy-security main restricted

deb http://kambing.vlsm.org/ubuntu breezy-security universe
deb-src http://kambing.vlsm.org/ubuntu breezy-security universe

deb http://kambing.vlsm.org/ubuntu breezy multiverse
deb-src http://kambing.vlsm.org/ubuntu breezy multiverse

deb http://id.archive.ubuntu.com/ubuntu breezy main restricted
deb-src http://id.archive.ubuntu.com/ubuntu breezy main restricted

deb http://id.archive.ubuntu.com/ubuntu breezy-updates main restricted
deb-src http://id.archive.ubuntu.com/ubuntu breezy-updates main restricted

deb http://id.archive.ubuntu.com/ubuntu breezy universe
deb-src http://id.archive.ubuntu.com/ubuntu breezy universe

deb http://id.archive.ubuntu.com/ubuntu breezy-backports main restricted univer
se multiverse
deb-src http://id.archive.ubuntu.com/ubuntu breezy-backports main restricted un
iverse multiverse

deb http://security.ubuntu.com/ubuntu breezy-security main restricted
deb-src http://security.ubuntu.com/ubuntu breezy-security main restricted

deb http://security.ubuntu.com/ubuntu breezy-security universe
deb-src http://security.ubuntu.com/ubuntu breezy-security universe
Setelah konfigurasi sorce list pastikan menjalankan update hingga selesai
root@proxy:~# apt-get update

6. Alokasi bandwith
Untuk pembatasan banwith saya menggunakan metode pembatasan tiap host/ip address dimana setiap komputer/host/ip address dibatasi kecepatan maksimal downloadnya, hal untuk mencegah agar koneksi terbagi rata meski klien menggunakan downloader. Asumsi kecepatan internet dalam keadaan stabil.

Komputer Server : Unlimited download rate
Komputer Staf : Maksimal 12kB download rate
Komputer Lab : Maksimal 10kB download rate
Komputer Admi : Maksimal 20kB download rate

7. Instalasi Squid
root@proxy:~# apt-get install squid

8. Konfigurasi Squid
Konfigurasi ini saya ambil dari situsnya walecha dan konfigurasinya miliknya Dani (Dani Firmansyah bukan ya ???), hanya saya rubah sedikit dan menambahkan delay pools. Yang berhuruf tebal adalah perubahan yang saya buat dan tambahkan.
root@proxy:~# vi /etc/squid/squid.conf
#============================================================$
# WELCOME TO SQUID 2 HIGH PERFORMANCES
#============================================================$

http_port 3128
#http_port 80
icp_port 3130

#============================================================$
# TAG: hierarchy_stoplist
# A list of words which, if found in a URL, cause the object to
# be handled directly by this cache. In other words, use this
# to not query neighbor caches for certain objects. You may
# list this option multiple times.
#
#We recommend you to use at least the following line.
#============================================================$
hierarchy_stoplist cgi-bin ? .js .jsp .g .do .php .asp .cgi localhost indosat.net.id
acl QUERY urlpath_regex cgi-bin \? .js .jsp .g .do .php .asp .cgi localhost indosat.net.id
no_cache deny QUERY
#============================================================$

#============================================================$
# OPTIONS WHICH AFFECT THE CACHE SIZE
#============================================================$
cache_mem 4 MB
maximum_object_size 10 MB
maximum_object_size_in_memory 32 KB
cache_swap_low 98%
cache_swap_high 99%
cache_replacement_policy heap LFUDA
memory_replacement_policy heap GDSF
high_memory_warning 70 MB
ipcache_size 4096
ipcache_low 98
ipcache_high 99
#============================================================$
# LOGFILE PATHNAMES AND CACHE DIRECTORIES
#============================================================$
cache_dir diskd /var/spool/squid 2000 8 256
cache_access_log /var/log/squid/access.log
cache_log /dev/null
cache_store_log /dev/null
mime_table /usr/share/squid/mime.conf
pid_filename /var/run/squid.pid
log_fqdn off
log_icp_queries off
buffered_logs off
emulate_httpd_log off

#============================================================$
# FTP section
#============================================================$
ftp_passive on
ftp_sanitycheck on

#============================================================$
# DNS resolution section
#============================================================$
dns_nameservers 127.0.0.1 202.134.1.10 202.134.0.155

#============================================================$
# Filesystem section
#============================================================$
diskd_program /usr/lib/squid/diskd

#============================================================$
# AUTH section
#============================================================$
#auth_param basic children 5
#auth_param basic realm Squid proxy-caching web server
#auth_param basic credentialsttl 2 hours
#auth_param basic casesensitive off

#============================================================$
# Refresh Rate
#============================================================$
refresh_pattern \.gif 4320 50% 43200
refresh_pattern \.jpg 4320 50% 43200
refresh_pattern \.tif 4320 50% 43200
refresh_pattern \.png 4320 50% 43200
refresh_pattern \.jpeg 4320 50% 43200
refresh_pattern ^http://www.friendster.com/.* 720 100% 4320
refresh_pattern ^http://mail.yahoo.com/.* 720 100% 4320
refresh_pattern ^http://*.yahoo.*/.* 720 100% 4320
refresh_pattern ^http://*.yimg.*/.* 720 100% 4320
refresh_pattern ^http://*.gmail.*/.* 720 100% 4320
refresh_pattern ^http://*.google.*/.* 720 100% 4320
refresh_pattern ^http://*korea.*/.* 720 100% 4320
refresh_pattern ^http://*.akamai.*/.* 720 100% 4320
refresh_pattern ^http://*.windowsmedia.*/.* 720 100% 4320
refresh_pattern ^http://*.googlesyndication.*/.* 720 100% 4320
refresh_pattern ^http://*.plasa.*/.* 720 100% 4320
refresh_pattern ^http://*.telkom.*/.* 720 100% 4320
refresh_pattern ^ftp: 10080 95% 40320 reload-into-ims override-lastmod
refresh_pattern . 0 20% 4320 reload-into-ims override-lastmod

quick_abort_min 0 KB
quick_abort_max 0 KB
quick_abort_pct 100%

#============================================================$
# ACL section
#============================================================$
acl all src 0.0.0.0/0.0.0.0
acl manager proto cache_object
acl localhost src 127.0.0.1/255.255.255.255
acl to_localhost dst 127.0.0.0/8

acl SSL_ports port 443 563 2083 # https, snews, 2083 untuk mengakses cpanel webhosting
#acl SSL_ports port 873 # rsync
acl Safe_ports port 80 # http
acl Safe_ports port 21 # ftp
acl Safe_ports port 443 563 # https, snews
acl Safe_ports port 70 # gopher
acl Safe_ports port 210 # wais
acl Safe_ports port 1025-65535 # unregistered ports
#acl Safe_ports port 280 # http-mgmt
#acl Safe_ports port 488 # gss-http
#acl Safe_ports port 591 # filemaker
#acl Safe_ports port 777 # multiling http
acl Safe_ports port 631 # cups
acl Safe_ports port 873 # rsync
acl Safe_ports port 901 # SWAT
acl purge method PURGE
acl CONNECT method CONNECT

# nama kota adalah nama ruangan di tempat saya
acl server src 10.25.10.1-10.25.10.10/255.255.255.255
acl staf src 10.25.10.11-10.25.10.40/255.255.255.255
acl lab src 10.25.10.100-10.25.10.150/255.255.255.255
acl admin src 10.25.10.26-10.25.10.28/255.255.255.255
acl swiss src 10.25.10.75/255.255.255.255

always_direct allow localhost server staf lab admin swiss
always_direct deny all

http_access allow manager all
http_access deny !Safe_ports
http_access allow purge localhost
http_access deny purge
http_access deny CONNECT !SSL_ports
http_access allow localhost

http_access allow server
http_access allow lab
http_access allow staf
http_access allow admin
http_access allow swiss

http_access deny all
http_reply_access allow all

icp_access allow all
reply_body_max_size 0 allow all
cache_mgr noc@abc.com
visible_hostname www.abc.com
header_access Accept-Encoding deny all

#============================================================$
# Transparent proxy setting
#============================================================$
httpd_accel_host virtual
httpd_accel_port 80
httpd_accel_with_proxy on
httpd_accel_uses_host_header on
httpd_accel_no_pmtu_disc on
httpd_accel_single_host off
half_closed_clients off
#forwarded_for on

#============================================================$
# MISCELLANEOUS
#============================================================$
logfile_rotate 3
negative_ttl 2 minutes
#digest_rebuild_period 30 minute
#digest_rewrite_period 30 minute
#digest_swapout_chunk_size 4096 bytes
client_persistent_connections on
server_persistent_connections on
pipeline_prefetch on
vary_ignore_expire on
reload_into_ims on
store_dir_select_algorithm round-robin
nonhierarchical_direct off
prefer_direct off
memory_pools off
shutdown_lifetime 10 seconds
cachemgr_passwd proxy all
ie_refresh on
cache_effective_user proxy
cache_effective_group proxy

#pembatasan banwith mulai disini
#menggunakan class 2, dimana kecepatan network unlimited tapi perhost limited
delay_pools 5

delay_class 1 2
delay_class 2 2
delay_class 3 2
delay_class 4 2
delay_class 5 2

delay_access 1 allow staf
delay_access 2 allow lab
delay_access 3 allow admin
delay_access 4 allow server
delay_access 5 allow swiss

delay_parameters 1 -1/-1 12000/15000
delay_parameters 2 -1/-1 10000/11000
delay_parameters 3 -1/-1 20000/30000
delay_parameters 4 -1/-1 -1/-1
delay_parameters 5 -1/-1 10000/11000
#pembatasan banwith berakhir disini

9. Instalasi bind9 (dns server)
root@proxy:~# apt-get install bind9

Setelah instalasi bind, bind gak perlu diedit sama sekali kecuali anda memiliki domain fiktif untuk kepentingan intranet (seperti contoh di http://linux.or.id/node/1095).

Kenapa diperlukan bind ? Jika tidak maka di pc klien dns server harus diisi dengan ip dns server yang telah disebut diatas, tapi jika kita gunakan dns server sendiri maka di pc klien dns server diisi dengan ip address pc proxy server, jelas hal ini akan mempercepat request.

10. Chain iptables untuk membikin transparent.
root@proxy:~# iptables -t nat -A PREROUTING -s 10.25.10.0/255.255.255.0 -i eth1 -p tcp -m tcp --dport 80 -j REDIRECT --to-ports 3128


Cek hasil konfigurasi iptables
root@proxy:~# iptables -t nat -nL
Chain PREROUTING (policy ACCEPT)
target prot opt source destination
REDIRECT tcp -- 10.25.10.0/24 0.0.0.0/0 tcp dpt:80 redir ports 3128

Chain POSTROUTING (policy ACCEPT)
target prot opt source destination

Chain OUTPUT (policy ACCEPT)
target prot opt source destination

Chain ini tidak bisa bertahan lama dalam arti setiap komputer reboot maka chain ini akan hilang. Untuk menghindari hal ini lakukan tahapan berikut :
• Simpan konfigurasi iptabales kedalam file
root@proxy:~# iptables-save > /etc/squid/proxy.rule

• Bikin file untuk load chains iptables
root@proxy:~# vi /etc/squid/proxyup
iptables-restore < /etc/squid/proxy.rule
echo 1 > /proc/sys/net/ipv4/ip_forward

• Buat symbolic link di rc pada semua runlevel
root@proxy:~# ln -s /etc/squid/proxyup /etc/rc1.d/S77proxyup
root@proxy:~# ln -s /etc/squid/proxyup /etc/rc2.d/S77proxyup
root@proxy:~# ln -s /etc/squid/proxyup /etc/rc3.d/S77proxyup
root@proxy:~# ln -s /etc/squid/proxyup /etc/rc4.d/S77proxyup
root@proxy:~# ln -s /etc/squid/proxyup /etc/rc5.d/S77proxyup
root@proxy:~# ln -s /etc/squid/proxyup /etc/rc6.d/S77proxyup
root@proxy:~# ln -s /etc/squid/proxyup /etc/rcS.d/S77proxyup

11. Untuk memastikan konfigurasi anda sudah benar, restartlah komputer proxy server. Kemudian ulangi tahapan 2, 3, 4.

Cek konfigurasi ip address, pastikan hasilnya sama dengan tahapan 2
root@proxy:~# cat /etc/network/interfaces

Cek routing table, pastikan hasilnya sama dengan tahapan 2
root@proxy:~# route -n

Cek ip dns server, pastikan hasilnya sama dengan tahapan 3
root@proxy:~# cat /etc/resolv.conf

Ulangi tahapan 4 dengan melakukan ping ke beberapa situs.

12. Setting disisi klien
Karena ini transparent proxy maka :
10.25.10.3• Set ip gateway klien ke ip proxy server (eth1)
10.25.10.3• Set ip dns server klien sama dengan diatas


Demikian panduan ini, semoga dapat bermanfaat bagi anda pengguna Linux pada khususnya. Seperti telah saya sampaikan diatas, barangkali ada step yang ketinggalan, koreksi, kritik, saran agar tidak segan-segan untuk mengirimkan email ke saya. Karena saya sendiri juga masih newbie dalam penggunaan Linux.


Sambungannya... (klik disini!)

Install SNMP dan MRTG Dengan Cepat

Yang pasti kamu harus login sebagai root yah…
Langkah pertama kita instal SNMP dahulu
Source untuk snmp, biasanya dah ada di CD distro Redhat anda
[root@kiosdigital]#rpm -Uvh ucd-snmp-4.2.1-7.i386.rpm \
> ucd-snmp-devel-4.2.1-7.i386.rpm \
> ucd-snmp-utils-4.2.1-7.i386.rpm
copy snmpd.conf menjadi snmpd.conf.default
[root@kiosdigital]#cp /etc/snmp/snmpd.conf /etc/snmp/snmpd.conf.default
edit file /etc/snmp/snmpd.conf dengan :
[root@kiosdigital]#vi /etc/snmp/snmpd.conf


#—-isi dari snmp———-
com2sec public default public
group public v1 public
group public v2c public
group public usm public
view all included .1
access public “” any noauth exact all none none
#————————–
Running snmp dengan perintah :
[root@kiosdigital]#/etc/rc.d/init.d/snmpd start
Periksa port snmp kamu dengan perintah :
[root@kiosdigital]#netstat -pln | grep snmpd
tcp 0 0 0.0.0.0:199 0.0.0.0:* LISTEN 687/snmpd
udp 0 0 0.0.0.0:161 0.0.0.0:* 687/snmpd
Bila terdapat tcp dan udp seperti nampak di atas, snmp anda berjalan!!
Sekarang Kita Menginstall MRTG
Kamu bisa download di situs :
http://www.rpmfind.net/linux/rpm2html/search.php?query=mrtg&submit=Search+…
atau juga di http://www.google.com heheheh…;p
[root@kiosdigital]#rpm -ivh mrtg-xx-x.src.rpm
Skarang membuat cfgmaker untuk mrtg kita
- Anda mempunyai ip address misal 202.138.1.1
- Anda mempunyai webserver pada /usr/local/apache/htdocs
[root@kiosdigital]#cfgmaker –global “WorkDir: /usr/local/apache/htdocs/mrtg” \
> –global “Options[_]: growright,bits” \
> public@202.138.1.1 > /etc/mrtg/202.138.1.1.cfg
Keterangan dari command cfgmaker:
- /usr/local/apache/htdocs/mrtg adalah letak dari halaman web mrtg yang anda inginkan.
- public@202.138.1.1 adalah akses pada nama snmpd yg telah anda buat, dan ip address snmpd tsb.
- /etc/mrtg/202.138.1.1.cfg adalah letak config dari public@ip_address yang anda inginkan.
Edit file /etc/mrtg/202.138.1.1.cfg
[root@kiosdigital]#vi /etc/mrtg/202.138.1.1.cfg
#————–tambahan————
#Agar auto start
RunAsDaemon:Yes
#Agar uptodate setiap 5 menit
Interval:5
#Agar auto resfresh pada browser
Refresh:300
#————————————
Selanjutnya kita membuat indexmaker dengan perintah :
[root@kiosdigital]#indexmaker –output=/usr/local/apache/htdocs/mrtg/index.html \
> /etc/mrtg/202.138.1.1.cfg
Sekarang kita running daemon mrtg yang udah kita buat tadi dengan perintah :
[root@kiosdigital]#mrtg /etc/mrtg/202.138.1.1.cfg
Periksa apakah daemon sudah running sebagai RunAsDaemon
[root@kiosdigital]#netstat -pln | grep perl
udp 10368 0 0.0.0.0:32769 0.0.0.0:* 744/perl
Bila terdapat udp seperti nampak di atas, mrtg anda berjalan!
Tambahkan di rc.local kamu biar mrtg dan snmp running saat booting..
[root@kiosdigital]#vi /etc/rc.local
/bin/rm /etc/mrtg/*.pid
mrtg /etc/mrtg/202.138.1.1.cfg
/etc/rc.d/init.d/snmpd start
Bila semua yang di atas udah kamu kerjain semua.. kita bisa liat hasilnya di :
http://dns.atau.ip.anda/mrtg/index.html

Selesai… Gampang khan… hehehe…

Sambungannya... (klik disini!)

Membuat WiFi Repeater *WDS*

Buat yang seneng maenan WiFi, mungkin tertarik untuk membuat WiFi Repeater, yang tujuannya untuk memperluas area WiFi yang udah ada tanpa menambah urusan dengan kabel.

Teknologinya disebut dengan WDS = Wireless Distribution System, di mana ada 1 WiFi Access Point yang utama dan WiFi Access Point lainnya sebagai repeater/relay.


1. Syarat pertamanya adalah: baik Access Point yang pertama maupun Access point repeater HARUS memiliki/mendukung fitur WDS. Pastikan dulu ttg hal ini!!!
2. Syarat kedua yang harus diperhatikan adalah: Authentication access point yang didukung dalam WDS hanyalah WEP 64/128 bit.
Dan semua Access Point yang terlibat dalam 1 koneksi harus menggunakan konfigurasi WEP yang sama persis.
3. Channel yang digunakan harus sama. Misal: Channel 3
4. Pastikan MAC Address repeater sudah diijinkan untuk konek pada Access Point utama.
Jika temen2 sudah memenuhi 4 syarat ini … maka yang perlu dilakukan hanya :
a. Aktifkan Wireless Bridging / WDS di semua Access Point yang ingin “digabungkan”
b. Catat MAC Address WiFi AP utama, lalu masukkan MAC Address itu ke WiFi repeater pada bagian WDS. Begitu juga sebaliknya.
c. Setting IP WiFi AP repeater sebagai bagian dari Network WiFi AP Utama
d. Matikan DHCP server di WiFi AP Repeater, krn DHCP akan diambil alih oleh WiFi AP Utama.

Catatan:
I. SSID tidak perlu sama
II. Ada kemungkinan beda Merk WiFi AP tidak bisa direlay
III. Sudah sukses dilakukan di Belkin F5D7231-4 sebagai WiFi AP Utama, JAHT WP-4001B2 sebagai WiFi AP Repeater.
IV. AP Utama tidak bisa mengaktifkan Mode Bursting tipe apa pun

Semoga bermanfaat

Sambungannya... (klik disini!)

Mikrotik, Apaan seh itu..?

Mungkin buat pemula seperti saya dan beberapa orang rekan yang cukup awam dengan barang aneh seperti mikrotik akan punya beberapa pertanyaan yang aneh juga. Seperti "Bisa gak seh mikrotik dijalanin di windows...?", nah biar gak tambah aneh pertanyaannya coba simak tulisan berikut ini.

Mikrotik adalah sebuah produk dari sebuah perusahaan IT, yang memproduksi software untuk membuat router yang handal dan tangguh serta lengkap dengan filtur-filtur selayaknya router, juga memproduksi hardware seperti wireless radio dan ethernet card. Pada kesempatan kali saya akan memberikan langkah-langkah install mikrotik router Os pada sebuah PC


spec minimal nya :

* CPU and motherboard - bisa pake P1 ampe P4, AMD, cyrix asal yang bukan multi-prosesor

* RAM - minimum 32 MiB, maximum 1 GiB; 64 MiB atau lebih sangat dianjurkan, kalau mau sekalian dibuat proxy , dianjurkan 1GB... perbandingannya, 15MB di memori ada 1GB di proxy..

* HDD minimal 128MB parallel ATA atau Compact Flash, tidak dianjurkan menggunakan UFD, SCSI, apa lagi S-ATA Very Happy

*NIC 10/100 atau 100/1000


Untuk keperluan beban yang besar ( network yang kompleks, routing yang rumit dll) disarankan untuk mempertimbangkan pemilihan resource PC yang memadai.

Meskipun demikian Mikrotik bukanlah free software, artinya kita harus membeli licensi terhadap segala fasiltas yang disediakan. Free trial hanya untuk 24 jam saja.

Kita bisa membeli software mikrotik dalam bentuk CD yang diinstall pada Hard disk atau disk on module (DOM). Jika kita membeli DOM tidak perlu install tetapi tinggal menancapkan DOM pada slot IDE PC kita.

1. Booting komputer dengan first boot device CD-ROM
2. Setelah proses booting akan muncul menu pilihan software yang mau di install, pilih sesuai kebutuhan yang akan direncanakan
3. Ketik “ i “ setelah selesai memilih software, lalu akan menu pilihan seperti ini :

* Do you want to keep old configuration ? [y/n] ketik Y
* Continue ? [y/n] ketik Y

Setelah itu proses installasi system dimulai, disini kita tidak perlu membuat partisi hardisk karena secara otomatis dia akan membuat partisi sendiri

4. Setelah proses installasi selesai maka kita akan di minta untuk merestart system, tekan enter untuk merestart system

5. Setelah computer booting kembali ke system mikrotik, akan ada pilihan untuk melakukan check system disk, tekan “ y “
Setelah itu akan muncul menu login:

* user=admin
* password=(kosong enter saja)

6. Untuk software license tekan “ y “ . Lalu enter beberapa kali sampai muncul prompt untuk command line

Selesai sudah cara install Mikrotik Router Os pada PC anda setelah itu anda tingal konfigurasi systemnya agar menjadi router yang tangguh dan handal.

Sambungannya... (klik disini!)

Firewall untuk router mikrotik

by harrychanputra

Untuk mengamankan router mikrotik dari traffic virus dan excess ping dapat digunakan skrip firewall berikut
Pertama buat address-list “ournetwork” yang berisi alamat IP radio, IP LAN dan IP WAN atau IP lainnya yang dapat dipercaya
Dalam contoh berikut alamat IP radio adalah = 10.0.0.0/16, IP LAN = 192.168.2.0/24 dan IP WAN = 203.89.24.0/21 dan IP lainnya yang dapat dipercaya = 202.67.33.7
Untuk membuat address-list dapat menggunakan contoh skrip seperti berikut ini tinggal disesuaikan dengan konfigurasi jaringan Anda.
Buat skrtip berikut menggunakan notepad kemudian copy-paste ke console mikrotik


/ ip firewall address-list
add list=ournetwork address=203.89.24.0/21 comment=”Datautama Network” \
disabled=no
add list=ournetwork address=10.0.0.0/16 comment=”IP Radio” disabled=no
add list=ournetwork address=192.168.2.0/24 comment=”LAN Network” disabled=no
Selanjutnya copy-paste skrip berikut pada console mikrotik

/ ip firewall filter
add chain=forward connection-state=established action=accept comment=”allow \
established connections” disabled=no
add chain=forward connection-state=related action=accept comment=”allow \
related connections” disabled=no
add chain=virus protocol=udp dst-port=135-139 action=drop comment=”Drop \
Messenger Worm” disabled=no
add chain=forward connection-state=invalid action=drop comment=”drop invalid \
connections” disabled=no
add chain=virus protocol=tcp dst-port=135-139 action=drop comment=”Drop \
Blaster Worm” disabled=no
add chain=virus protocol=tcp dst-port=1433-1434 action=drop comment=”Worm” \
disabled=no
add chain=virus protocol=tcp dst-port=445 action=drop comment=”Drop Blaster \
Worm” disabled=no
add chain=virus protocol=udp dst-port=445 action=drop comment=”Drop Blaster \
Worm” disabled=no
add chain=virus protocol=tcp dst-port=593 action=drop comment=”________” \
disabled=no
add chain=virus protocol=tcp dst-port=1024-1030 action=drop comment=”________” \
disabled=no
add chain=virus protocol=tcp dst-port=1080 action=drop comment=”Drop MyDoom” \
disabled=no
add chain=virus protocol=tcp dst-port=1214 action=drop comment=”________” \
disabled=no
add chain=virus protocol=tcp dst-port=1363 action=drop comment=”ndm requester” \
disabled=no
add chain=virus protocol=tcp dst-port=1364 action=drop comment=”ndm server” \
disabled=no
add chain=virus protocol=tcp dst-port=1368 action=drop comment=”screen cast” \
disabled=no
add chain=virus protocol=tcp dst-port=1373 action=drop comment=”hromgrafx” \
disabled=no
add chain=virus protocol=tcp dst-port=1377 action=drop comment=”cichlid” \
disabled=no
add chain=virus protocol=tcp dst-port=2745 action=drop comment=”Bagle Virus” \
disabled=no
add chain=virus protocol=tcp dst-port=2283 action=drop comment=”Drop Dumaru.Y” \
disabled=no
add chain=virus protocol=tcp dst-port=2535 action=drop comment=”Drop Beagle” \
disabled=no
add chain=virus protocol=tcp dst-port=2745 action=drop comment=”Drop \
Beagle.C-K” disabled=no
add chain=virus protocol=tcp dst-port=3127 action=drop comment=”Drop MyDoom” \
disabled=no
add chain=virus protocol=tcp dst-port=3410 action=drop comment=”Drop Backdoor \
OptixPro” disabled=no
add chain=virus protocol=tcp dst-port=4444 action=drop comment=”Worm” \
disabled=no
add chain=virus protocol=udp dst-port=4444 action=drop comment=”Worm” \
disabled=no
add chain=virus protocol=tcp dst-port=5554 action=drop comment=”Drop Sasser” \
disabled=no
add chain=virus protocol=tcp dst-port=8866 action=drop comment=”Drop Beagle.B” \
disabled=no
add chain=virus protocol=tcp dst-port=9898 action=drop comment=”Drop \
Dabber.A-B” disabled=no
add chain=virus protocol=tcp dst-port=10000 action=drop comment=”Drop \
Dumaru.Y, sebaiknya di didisable karena juga sering digunakan utk vpn atau \
webmin” disabled=yes
add chain=virus protocol=tcp dst-port=10080 action=drop comment=”Drop \
MyDoom.B” disabled=no
add chain=virus protocol=tcp dst-port=12345 action=drop comment=”Drop NetBus” \
disabled=no
add chain=virus protocol=tcp dst-port=17300 action=drop comment=”Drop Kuang2″ \
disabled=no
add chain=virus protocol=tcp dst-port=27374 action=drop comment=”Drop \
SubSeven” disabled=no
add chain=virus protocol=tcp dst-port=65506 action=drop comment=”Drop PhatBot, \
Agobot, Gaobot” disabled=no
add chain=forward action=jump jump-target=virus comment=”jump to the virus \
chain” disabled=no
add chain=input connection-state=established action=accept comment=”Accept \
established connections” disabled=no
add chain=input connection-state=related action=accept comment=”Accept related \
connections” disabled=no
add chain=input connection-state=invalid action=drop comment=”Drop invalid \
connections” disabled=no
add chain=input protocol=udp action=accept comment=”UDP” disabled=no
add chain=input protocol=icmp limit=50/5s,2 action=accept comment=”Allow \
limited pings” disabled=no
add chain=input protocol=icmp action=drop comment=”Drop excess pings” \
disabled=no
add chain=input protocol=tcp dst-port=21 src-address-list=ournetwork \
action=accept comment=”FTP” disabled=no
add chain=input protocol=tcp dst-port=22 src-address-list=ournetwork \
action=accept comment=”SSH for secure shell” disabled=no
add chain=input protocol=tcp dst-port=23 src-address-list=ournetwork \
action=accept comment=”Telnet” disabled=no
add chain=input protocol=tcp dst-port=80 src-address-list=ournetwork \
action=accept comment=”Web” disabled=no
add chain=input protocol=tcp dst-port=8291 src-address-list=ournetwork \
action=accept comment=”winbox” disabled=no
add chain=input protocol=tcp dst-port=1723 action=accept comment=”pptp-server” \
disabled=no
add chain=input src-address-list=ournetwork action=accept comment=”From \
Datautama network” disabled=no
add chain=input action=log log-prefix=”DROP INPUT” comment=”Log everything \
else” disabled=no
add chain=input action=drop comment=”Drop everything else” disabled=no

Efek dari skrip diatas adalah:
1. router mikrotik hanya dapat diakses FTP, SSH, Web dan Winbox dari IP yang didefinisikan dalam address-list “ournetwork” sehingga tidak bisa diakses dari sembarang tempat.
2. Port-port yang sering dimanfaatkan virus di blok sehingga traffic virus tidak dapat dilewatkan, tetapi perlu diperhatikan jika ada user yang kesulitan mengakses service tertentu harus dicek pada chain=”virus” apakah port yang dibutuhkan user tersebut terblok oleh firewall.
3. Packet ping dibatasi untuk menghindari excess ping.
Selain itu yang perlu diperhatikan adalah: sebaiknya buat user baru dan password dengan group full kemudian disable user admin, hal ini untuk meminimasi resiko mikrotik Anda di hack orang.
Selamat mencoba
source dari teman2 DutaUtama

Sambungannya... (klik disini!)

Mikrotik PC Router Installation

Instalasi Mikrotik
1. Booting melalui CD-ROM
2. Setelah proses booting akan muncul menu pilihan software yang mau di install, pilih sesuai kebutuhan yang akan direncanakan.
3. Ketik (i) setelah selesai memilih software, lalu akan menu pilihan seperti ini :

- Do you want to keep old configuration ? [ y/n] ketik Y
- Continue ? [ y/n] ketik Y


Setelah itu proses installasi system dimulai, disini kita tidak perlu membuat partisi hardisk karena secara otomatis dia akan membuat partisi sendiri.
Tunggu Proses Installasi
4. Setelah proses installasi selesai maka kita akan di minta untuk merestart system, tekan enter untuk merestart system.
5. Setelah computer booting kembali ke system mikrotik, akan ada pilihan untuk melakukan check system disk, tekan “ y “ .
6. Setelah itu akan muncul menu login
Mikrotik login = admin
Password = ( kosong , enter saja )
7. Untuk software license tekan “ y “ . Lalu enter beberapa kali sampai muncul prompt untuk command line.

Setting IP Address, Gateway & Name server
1. IP Address
#ip address add address=(ip address / netmask) interface=(nama
interface, ether1 atau ehter2 bila ada 2 network card)
Perintah ip address print adalah untuk melihat hasil dari konfigurasi.

2. Gateway
#ip route add gateway=(ip gateway)
Perintah ip route print adalah untuk melihat routing table.
3. Name Server
#ip dns set primary-dns=(dns utama) seconday-dns=(dns ke dua)
Perintah ip dns print adalah untuk melihat hasil dari konfigurasi dns.

Setting Routing
#ip route add dst-address=( ip network atau ip host yang dituju/CIDR) gateway=( ip gateway untuk melewati paket)
Artinya tujuan network ( ip network atau ip host yang dituju/CIDR) lewat gateway ( ip gateway untuk melewati paket)

Ket : CIDR = Classes InterDomain Routing
Keterangan lebih lanjut :
http://www.ilmukomputer.org/?s=mikrotik
http://www.mikrotik.co.id/


Sambungannya... (klik disini!)

Friday, 27 June 2008

Start Internet Cafe Business 2

Tourists and locals, students, people of all ages in just about every walk of life love Cybercafes, WiFi Hot Spots and if you're serious about being the owner of one, this guide is for you!

We remember what it was like when we decided to open our own Cybercafe years ago. We were willing to pay anyone to help us learn all we could about this unique industry to make sure that we were successful. Realizing that there was no complete source of information available, and after years of running the store, we learned that this was not any ordinary type of business and decided to create The internet Cafe Guide. Over the years and through actual experience, we have gathered what we consider very critical secrets and useful information that pertains specifically to this industry whether you plan on a Cafe with 2 computers or over 50!


In the early 90's there were less than 100 Cybercafes. Now there are almost 17,000 in 65 countries worldwide.

If you're serious about opening your own Internet Cafe, you need to learn all you can about this unique business opportunity.

These are a few of the topics contained in the guide:

Choosing the correct location, decor and design for your Café

What type of Food & beverage services you should offer

Managing a successful Espresso Bar

How to determine what to charge for computer time

What type of computer equipment to purchase, and setting up a wireless network that works most efficiently for an Internet Cafe

Essential secrets that pertain specifically to this unique business

Profit through peripheral equipment: printers, photocopying,


faxing, scanners, telephone services & more


Add to your Cafe income offering computer and internet classes

How to properly promote your Cafe

How to make money with computer LAN and Internet gaming

Video conferencing, digital camera services, Resume services

How to configure remote e-mail access for travelers

Retail products opportunities

Plus many more essential secrets to insure your success in the


Internet Cafe industry!


Sambungannya... (klik disini!)

Start Internet Cafe Business

If you want to start Internet cafe business, here are some general guidelines and pointers to different options on software, franchises, and Internet cafe business plans.

A cybercafe is a business just like any other business, but due to the novelty of the whole industry (10 years young, as of September 1st, 2004), the basic business models are still very much in the development phase.

There have been many failures, but many successes in the cybercafe industry as well.

The most important thing is to learn from the existing cybercafes and those that failed before you open your own Internet cafe.

The name of the game is planning ahead. To organize your thoughts on how to approach opening a cybercafe, you should make a business plan.


Start Internet Cafe Business - Business Plans

Business plans serve multiple purposes. Business plans are great for:

  • Organizing your thoughts on starting an Internet cafe
  • Checking the viability of the business (as business plans normally include projections of profitability)
  • Giving investors, prospective investors, and other related parties an idea of how the business will be run and how you are going to make money with it
There are many ways in which you can organize your business plan to start Internet cafe business, and you can use some of the available ready-made plans as the framework for your own business plan.

Generalized, the items in the Internet cafe business plan usually include:

  • Stating your business goals
  • Strategies you'll use to meet your business goals
  • Potential problems that may confront at your Internet cafe and ways to solve them
  • The organizational structure of your cafe
  • The amount of financial capital required until the business becomes self-financing/profitable

Start Internet Cafe Business - Franchises

Franchises in general are businesses with pre-made business plans. You simply take the business plan along with the brand name, and start your own branch.

The benefits of using someone elses business plans and brand is that the brand may have gained recognition and the business plan may have been proved in real life.

The downside of entering a franchise to start Internet cafe business is that you may have to have significant amount of capital to enter the franchise agreement. Also, you have to follow the franchise rules in order to continue using the franchise brand.

How to Start an Internet Cafe - Business Models

When building your plan for business, one of the most important things to consider is the overall business model.

There are three main business models for Internet cafe businesses, but naturally you can use any variation or innovation within imagination to start Internet cafe business.

In fact, giving a unique selling proposition (distinguishing your cybercafe from the competition) should be one of your objectives.

The first business model, and the oldest, emphasizes giving basic Internet connection. You may even decide to forgo the cafe side of business altogether and start an automated Internet kiosk instead.

This type of business is typically volume based, so you need to get a lot of traffic to your location in order to make money.

The second basic model expands from the first model and includes offering a lot of extra services, such as a full cafeteria and basic office services, which is one way of to start Internet cafe business.

Under this model, your customers may come to the cafe for a variety of reasons, some for the coffee, some for the Internet connection, some for the other services.

Under the second business model, some have even expanded into Internet cafes from other business areas.

For example, some computer repair shops have opened cybercafes, so that customers can get a favorite place for both repairing their computer and surfing the web on a cafeteria.

In fact, under the expanded Internet cafe business model, you can upsell other services, such as home broadband connections, or computer accessories, to your customers.

This may bring additional revenues, but can also make it less clear to customers just what your cafe is all about.

Under the third major business model, Internet cafes offer specialized services to their customers. For example, some cybercafes have specialized in serving PC gamers.

Another popular specialization area is to offer business center-like services, where you offer an "office away from office" to your (business) customers.

Specialized Internet cafes typically need to charge a bit more in fees from their clients, due to the fact that the potential number of customers is simply fewer than with more generic business models.

However, the upselling opportunities may be as good or better in the third business model than in the second (Internet game cafes can sell computer games, business center cafes can sell other business services, for example).


Sambungannya... (klik disini!)

Internet cafe history

Internet cafe history started with the opening of the first cybercafe, Cafe Cyberia, in London (UK) on September 1st, 1994.

The founder of the first Internet cafe, Eva Pascoe, was working on her PhD at the time.

She got the idea to mixing sipping coffee to surfing the web while sitting at one of coffee shops near the City University of London.

Cafe Cyberia started with half a dozen HP computers, connected to the Internet through dial-up modems that were able to transfer data at 9.6 kilobits per second.

As the first Internet cafe, Cafe Cyberia got tremendous publicity, and additional investments into the business from likes of Mick Jagger and Maurice Saatchi.

With the success of Cafe Cyberia, the Internet Cafe business got into a flying start, and there were over 60 similar cafes over the world by the Summer of 1995.

Ms Pascoe sold her stake in Cafe Cyberia (to three Korean investors) in 1998 and moved to shape another field of online business, online fashion commerce.

If you feel nostalgic, you can still find the original Cafe Cyberia from London's West End, at Whitfield St., behind Goodge St. station. However, the cafe was renamed "Be the Reds" by the new Korean owners ("Be the Reds" is a supporting cheer for the South Korean national soccer team).


Internet Cafe History - U.S.

Although the first Internet cafe was launched in Europe, there had been similar activity already in the U.S. even before the launch of Cafe Cyberia.

SFnet, which was launched in San Francisco in 1991 (originally as a bulletin board), was not an Internet Cafe, but rather a network of 20 coin-operated computers providing a dial-up connection to the Internet with a 2400 baud modem.

The first actual U.S. Internet cafe (according to a 1995 Wall Street Journal article) was a Chicago cyber cafe called Suba Internet Center, launched in April 1995 by Todd Bodenstein and Alex Strasheim.

Suba was located at 2945 N. Broadway in Chicago, and was sold to to Bean.Net in 2000 by the founders.

Internet Cafe History 1995 - 1999

From the tens of cybercafes by mid-1995, the industry expanded into thousands by 1997.

Internet cafes not only became a natural way for travelers to send and check email, but also a way in which local residents got access to the latest software applications.

With the continuing success of ecommerce and related fields, high-profile entrepreneur Stelios Haji-Ioannou and his company easyGroup entered Internet cafe business in 1999 with the easyInternetCafe franchise.

By 2005, easyInternetCafe had become the best known and most successful Internet cafe franchise in the world.

Internet Cafe History 2000 - Today

In the U.S., the burst of the Internet bubble by late 2000 also changed the Internet Cafe industry overnight as the sources for new venture capital money virtually disappeared.

Also, the increasing success of portable computers and WiFi Internet access, combined with the fact that more and more people were having Internet access at home, resulted in fewer customers for the Internet cafes.

However, as a dynamic industry, many new cybercafes and many of the old ones started to offer a bit more targeted services than just coffee and computers, to bring in new customers.

For example, some cybercafes started to offer services primarily for gamers (and still do).

Typically, these cafes offer the latest computer games with state of the art computers.

The success of broadband network gaming brought the concept of LAN parties to these Internet cafes, as they organise gaming tournaments over broadband LAN connections.

By late 2002, the Internet gaming cybercafes had become a huge success around the world.

For example, according to some estimates, there were over 4,000 cybercafes in Taiwan by 2002, most of them focused on providing gaming.

In South Korea, the PC Bang (the South Korean name for internet gaming cafes) industry first came into existence in the mid 1990s.

Recently, it was estimated that there were over 22,000 PC Bangs (the name of Internet gaming cafes in South Korea) in South Korea at the beginning of 2006.

In addition, during January 2006, Intel, the global PC chip manufacturer, made another milestone into the Internet cafe history by opening a 120 computer PC Bang operation at Nowon-gu, in northern Seoul, South Korea.

However, as many Internet cafes in some countries have evolved into advanced gaming or business centers, the original cybercafe idea (of providing basic Internet access) is still a major growth story in many parts of the world.

India, for example, has over 50,000 Internet cafes with over 500,000 customers each month, according to some estimates. One Indian company alone, Sify Limited, which operates the iWay Internet cafe franchises, has over 3,100 cybercafes in 149 Indian cities.

One significant historic milestone in Internet cafe history has been the introduction of the Yahoo! Mail Internet Cafe Awards, awarded in September 2004, to celebrate the 10th birthday of cybercafe industry.


Sambungannya... (klik disini!)